Knowledge from the field of mechanical calibration
The knowledge page measured variable mechanics offers you information about the mechanical measurand pressure. Get answers to questions about pressure test equipments, sensors, types and calibrations.
Here you will find answers to the following questions:
- On which pressure measuring methods are pressure test equipments based?
- What indirect pressure test equipments are available?
- Which pressure sensors are available?
- Overview of the print types
- How is the calibration of pressure test equipments performed?
- Possibilities of pressure calibration?
- How does a Bourdon tube pressure test equipment work?
- How does the principle of a differential pressure test equipment with diaphragm work?
- Which reference types are distinguished for pressure calibration?
- How is the calibration of torque spanners and torque transducers carried out?
- How is the angle of rotation calibrated?
- How is force calibration carried out?
- What are TEDS?
- Can Testo Industrial Services overwrite TEDS?
- How do I recognise whether my sensor has a TED chip?
On which pressure measuring methods are pressure test equipments based?
The methods for measuring pressure can be distinguished according to the underlying physical principles. A distinction is made between direct and indirect pressure measuring devices. A direct pressure gauge relates directly to the definition of the physical quantity of pressure; these include, for example, piston manometers and liquid manometers. Indirect pressure gauges make use of secondary physical effects and derive the pressure through them, i.e. they measure quantities, such as mechanical or electrical, which are clearly related to the pressure. These include, for example, pressure gauges with spring elastic measuring elements (Bourdon tube pressure gauges, diaphragm pressure gauges, etc.) and pressure sensors.
What indirect pressure test equipments are available?
Basically, a distinction is made between spring-elastic and electronic pressure gauges. Pressure gauges with spring-elastic measuring elements combine high metrological quality, simple operation, robustness and adaptability with the advantages of industrial and cost-effective production. With spring elastic measuring elements, there is no need for complex electrical or pneumatic supplies. Electronic pressure gauges or pressure transducers are a widely used form of pressure sensing element. A pressure sensor is a measuring element which converts the physical measurand pressure into an electrical quantity.
Which pressure sensors are available?
Commonly used sensor methods are as follows:
- Thin Film Strain Gauge
- Ceramic thick film sensor
- Piezoresistive sensor element
- Piezoelectric sensor element
- Capacitive sensors

Overview of the print types
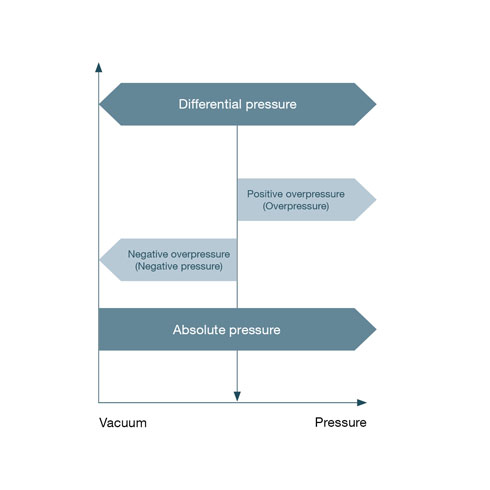
Pressure measurements compare a current pressure with a reference pressure. In pressure measurement technology, a distinction is made between four types of pressure which allow a statement to be made about the relationship between the measured pressure and the reference pressure.
Absolute pressure (p abs)
- measured pressure above absolute zero
- Reference: ideal vacuum
- Measuring pressure always greater than reference pressure
Relative pressure (p rel)
- The relative pressure measurement measures the difference to the prevailing ambient pressure.
- This is dependent on various parameters (e.g. distance to sea level)
- Relative to this we speak of positive and negative overpressure
positive overpressure (gauge)
- measured pressure above the barometric daily air pressure
- Reference: Ambient pressure
- Measuring pressure always greater than reference pressure
negative overpressure (vacuum)
- measured pressure below the barometric daily air pressure
- Reference: Ambient pressure
- Measuring pressure always lower than reference pressure
Differential pressure (Δ p)
- measured pressure above or below any reference pressure
- Measuring pressure lower or higher than reference pressure
How is the calibration of pressure test equipments performed?
Calibration of pressure gauges can be performed according to different procedures. Which procedure is carried out depends on the class accuracy of the measuring instrument to be calibrated. Before measuring a series of measurements, a preload must be carried out to ensure that the complete pipe system is tight. Here pressure is applied to the measuring range end value of the device, after a holding time of approx. 30 seconds the pressure can be completely released again. If the pressure is unstable, the tightness of the pipe system must be ensured first; if the pressure is stable, calibration can be started. For this purpose, several measuring points (which are evenly distributed over the measuring range) are first approached from bottom to top (in the upward direction) and then also from top to bottom (in the downward direction). The holding times, measuring points and the number of preloads depend on the selected calibration sequence (A / B / C).
Possibilities of pressure calibration?
The following measuring systems are preferably used for the calibration of pressure measuring instruments:
- Pressure balances (piston manometers)
- Quartz spiral manometer
- Pressure calibrators and controllers

How does a Bourdon tube pressure test equipment work?
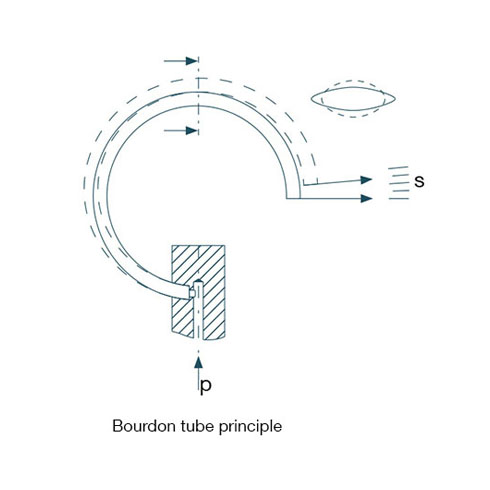
Bourdon tube pressure gauges are one of the most commonly used mechanical pressure measuring devices. The principle is based on an elastic spring (which is also called a Bourdon spring) and a circularly bent tube with an oval cross section. When pressure is applied to the interior of the Bourdon tube, the cross section changes and an annular stress is created which increases the radius of the circular spring. This deflection is the measure of the pressure. To make the relatively small travel at the end of such a spring visible, a pointer mechanism is used. This enlarges the path and converts it into a rotary motion.
How does the principle of a differential pressure test equipment with diaphragm work?

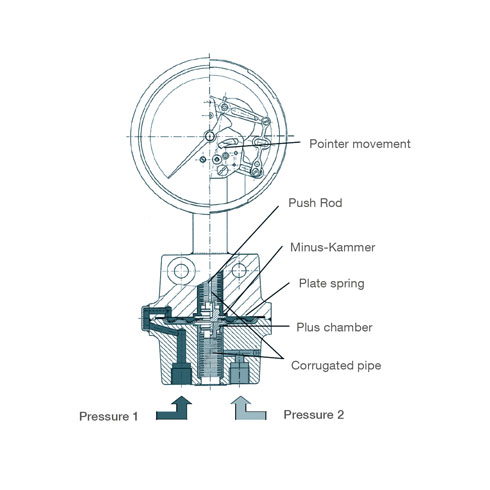
A differential pressure gauge has two measuring chambers (plus and minus) which are separated by the diaphragm. The metal bellows seal the pressure chambers from the atmosphere. The pressure difference between the positive and negative measuring medium chambers causes an axial measuring element deflection (measuring displacement). This measuring path is transferred to the movement via the push rod and thus converts the measuring path into a movement of the pointer.
These measuring instruments are mainly used for:
- Monitoring of filter systems by displaying the pressure loss
- Level indicator on open and closed containers
- Flow measurement for fluids (liquids, gases and vapours)
Which reference types are distinguished for pressure calibration?
In our pressure laboratory we distinguish calibration according to two references: Pressure balances and pressure controllers. Pressure regulators have a high accuracy, can be automated, regulate the required pressures independently and are therefore ideally suited for the calibration of your working standards. For your reference standards, we use the more complex method of calibration by means of pressure balances. A pressure balance makes use of the physical property of pressure. The necessary pressure is generated with the aid of a mass disc and a piston/cylinder system. With this proven method, the necessary accuracy for the calibration of reference standards can be achieved.
How is the calibration of torque spanners and torque transducers carried out?
For the calibration of torque spanners, mostly automatic and manually operated measuring stations are used. Here, the torque transducer rotates and thus introduces the desired torques into the tightening tool. The standard stipulates that this must be carried out at three different stages, depending on the test equipment, and must be repeated five times in each case. The currently valid standard DIN EN ISO6789:2017 clearly defines the test stages and covers the complete measuring range of the test equipment. The procedure for calibrating torque transducers deviates from this. Torque transducers are calibrated continuously, e.g. to exclude influences due to short-term creep.
How is the angle of rotation calibrated?
When calibrating rotation angles, a distinction is made between direct and indirect measuring systems. Direct measuring systems measure the angle of rotation via e.g. a glass scale. These sensors are installed in the calibration device as free of transverse forces and stresses as possible and the individual measurement series are run step by step. Indirect measuring systems are usually installed in torque spanners in the form of a gyroscope. For calibration, in addition to the angle of rotation, a torque must also be applied and maintained during the measurement.
How is force calibration carried out?
The force measurement takes place in a material testing machine optimised for calibration, which has the necessary rigidity and also perpendicularity. Tensile and compressive forces can be applied and maintained in steps by means of rising and falling spindles. This calibration is characterized by a high degree of flexibility in the selection of measuring points.
What are TEDS?
TEDS stands for ‘Transducer Electronic Data Sheet’. A TED is an electronic data sheet that is used in sensors or transducers. TEDS are subject to the IEEE 1451 standard. The most important information, such as manufacturer information, model numbers, measuring ranges and calibration data, is stored on the TED. This data can then be automatically read out and identified by the measuring system.
Can Testo Industrial Services overwrite TEDS?
Yes, we at Testo Industrial Services are able to write to TEDS and can save essential data such as the sensitivity (the characteristic value) and the recalibration date on the TED. Because sensor data can change, it is important to keep the essential information up to date after calibration so that your sensor is ready for use again.
We support you with this:

How do I recognise whether my sensor has a TED chip?
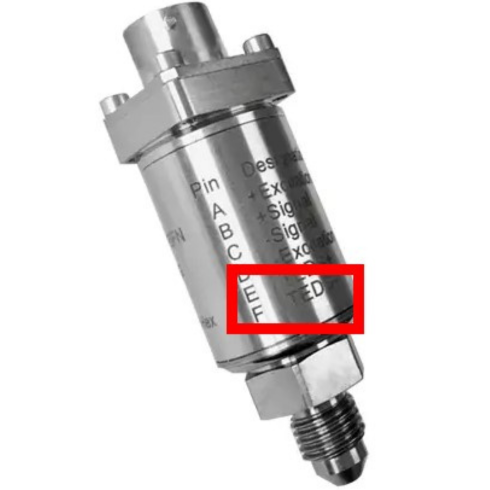
You can easily recognise whether a TED chip is installed in a sensor by the engraving/print ‘TEDS’ on the sensor itself.
Don't know whether your sensor has a TED chip? Contact us: info(at)testotis.de